Timber Ceiling Beam

Installing a Timber Ceiling Beam

We have been looking forward to adding this single timber beam to our home for more than 3 years! With the addition of our great room, which features decorative timber beams, the kitchen dining area really needed to join the club.

How hard could it be? Rule #1 – Don’t under estimate working with timbers. RESPECT.

This timber beam is going to be installed over the 2 1/2″ drop down support beam between the kitchen and dining room. First thing Buddy did was measure everything out, well, mostly everything. The width of the space, the height needed to cover the drop and the area for a 2ft return wall.

Beam is dry and straight and ready to be cut into. All seems good.

We even purchased a specialty Irwin Hand Saw just for this project. Continue reading

Cutting Boards?

Yes, Cutting Boards. 

Starting with maple, walnut and cherry wood pieces, and 2 size options.


Let us show you how it’s done.

Tools needed:  Radial Arm Saw, Table Saw, Planer and Clamps
You will also need wood glue and talent.

The talented eye is needed for selecting which pieces go together on each board. Based on grain pattern and color.

These cherry pieces were chosen with sap to add a certain amount of character.

Clamped up, wood glue will need about 1 1/2 hours to dry. Notice the filler pieces between the board and the clamps, they are important as we do not want clamp marks.

Ready for planing and being cut to size.

Looking good!  These 4 are now ready for hand sanding, eased edges and finish. Bring on the Howard’s Butcher Block Conditioner.

Walnut – Maple, Cherry-Cherry and 2 Cherry-Maple.  Who knows which one I’m going to want to keep?

Cherry – Maple

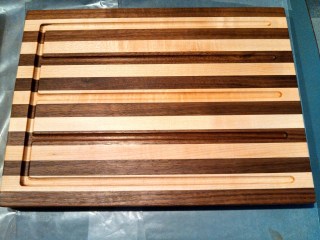
Walnut – Maple


Size shown 11 3/4″ x 16″ x 1″ (approx)


Who wants one? Or two? $40 for the Cherry – Maple and the Walnut – Maple + Shipping

Routed drip detail added to this one. 

What do you think? Only $10 extra!

Find US on Etsy!

We’ve made a few all walnut and they may win out as the favorite…we will see!